Why is my candle not burning evenly? What is candle tunnelling and how to fix it!
Sep 26 , 2022
The beauty of candle making is that the finished pieces will not only be beautiful, but also useful. Once we have made our candles, they will be used sooner or later, so it's good to be able to make a candle that is not only beautiful, but also burns as perfectly as possible. Poorly made candles can soot or burn unevenly, which can also lead to wasted wax, so let's take a look at what can cause a candle to burn unevenly.
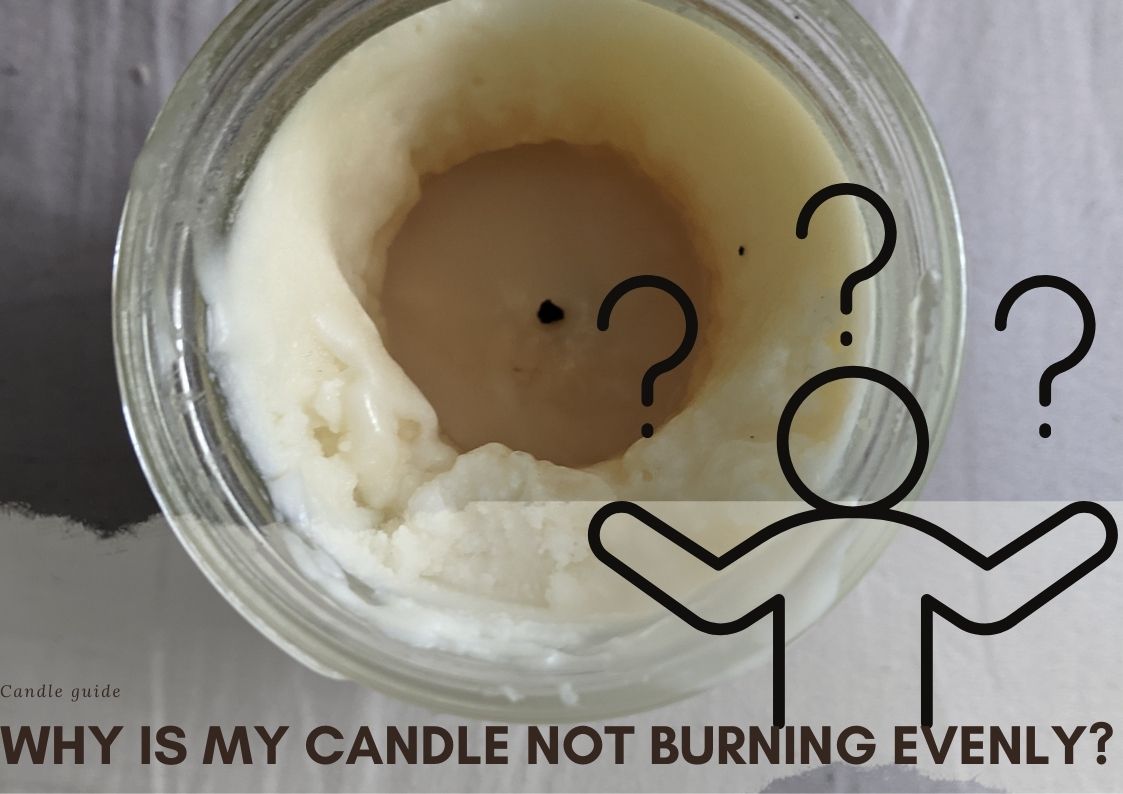
Tunnelling
Tunnelling is a very simple phenomenon to recognise. In this case, the wax does not melt over the entire surface of the candle and reach the wick, but only in a small cross-sectional circle, resulting in the wick digging a tunnel-like, round hole around itself.
This is not only an aesthetic defect, as it prevents the full release of the fragrances mixed into the wax, which do not reach their full potential, as well as it stops the wax near the sides of the vessel from burning. Not to mention the fact that a wick that "bores" itself deep into the wax can often burn out. There are two main causes of this phenomenon:
User error
As a user, it is very important that when you first light the candle, you allow the wax to melt on its full surface. Blowing or extinguishing the candle too early can lead to tunnelling. This is due to the property of wax (especially natural waxes) that it needs a long time to harden. Although a candle that was poured yesterday and one that has been hardening for a month may look similar at first glance, this is not the case in reality. So if we burn our candle for a short time and then blow it out, the next time it is lit, the material near the wick will be much softer and therefore will melt more easily than the wax around the edge of the pot. This process will lead to tunnelling in most cases.
Using the wrong size wick
If you choose too small a wick, it may not be strong enough to melt the entire surface of the wax.
This problem occurs most often with large surface area candles when inexperienced candle makers choose wicks that are too thin, but it is also common with mass-produced candles that are sold in shops. If you buy handcrafted candles from a reliable source and use them properly, you don't have to worry about this phenomenon.
How to fix it?
Tunnelling is a self-correcting event in some cases, but it is more common for a candle that has started to burn in this way to continue to burn to the bottom of the wick like this. Fortunately, this is a phenomenon that, if detected early enough, can often be corrected.
If a freshly lit candle shows the typical tunnelling ledge, you should not immediately worry. A well poured candle with a proper wick will be able to "repair itself" after 2-3 hours of burning. If the phenomenon persists and the tunnel seems to be getting deeper, you can use the so-called tinfoil solution. This works by redirecting the heat.
Cut the wick of the extinguished and extinguished candle back to the correct length, then cover the wax with aluminium foil, leaving a hole for the flame in the middle. Under the 'tent' thus formed, the heat rising from the wax will be trapped and, after a few hours of burning, will produce enough heat to melt the whole surface of the wax uniformly. This trick may need to be repeated several times to achieve perfect results.
The tinfoil solution only works if the candle has been fitted with the correct size wick and tunnelling has only occurred due to improper use.
If you don't want to wait and fiddle around with tinfoil, a good and quick solution is to re-melt the top surface of the candle with a heat gun.
If the tunnelling is caused by using the wrong size wick, it will be a bit harder to fix.
In this case, the incorrectly sized wick should be removed from the candle, the wax should be re-melted using an oven to get an even surface, and then a new wick inserted. This "surgery" is a risky and labour-intensive operation and should only be attempted on more expensive candles. But since (as mentioned earlier) the makers of these handcrafted candles know their trade, the use of an incorrect wick in such cases should not be an issue at all.
Uncentered wick
If the wick of the candle is not placed in the middle of the pot, or if it is not fixed firmly enough during pouring, the wax will melt unevenly even if the wick is the right size. In this case, not only can some of the wax be wasted, but the part of the candleholder closer to the wick can also be discoloured by soot from burning.
The correct placement of the wick is not only a matter of aesthetics, it is also a safety risk if it is not done properly. If the wick is too close to one side of the vessel, the heat from it can crack the vessel, which can lead to highly dangerous fire situations.
Incorrect wick length
Using a wick that is too long or too short can lead not only to uneven melting, but often to the candle going out. To avoid these inconveniences, it may be a good idea to cut back the candle wick before each burning. The correct wick length should be between 1/8" and 1/4" (i.e. approximately 3 and 6mm). The wick can be cut with scissors, nail clippers, or a specially made wick trimmer.
Candle cratering
If the candle is not properly poured and the wax used has cooled too quickly, craters can form on the surface. These indentations can prevent the wax from melting evenly and lead to tunnelling. If they are not too deep, they are most often only an aesthetic defect and do not affect the burn itself.
If they are deep, they can affect the melting of the wax and lead to tunnelling. In such cases, it may be a good idea to melt the surface of the wax so that the liquid wax spreads evenly and no tunnelling or other abnormal burning phenomena can occur on the first burn.
Using the wrong method to lit the candle
If you use a short lighter or matches, you will instinctively tilt the candle when you want to light it. This gives you the chance of an uneven burn from the first moment, so use a long-stemmed match or lighter if you can. These are also a much safer way to light the candle, especially if it has been burning for a long time and the wick is sitting deeply in the holder.
Not avoiding drafts
Perhaps one of the most common causes of uneven burning are stray breezes and drafts, which will cause the candle flame to flicker and the wax to melt unevenly.
To avoid these, choose the location of the candle carefully. Do not place it in an open window or near an air-conditioning fan, but find a spot well protected from the wind. Having said all this, make sure that you only light scented candles in a well-ventilated, spacious area, especially if you have pets or small children in the house who are more sensitive to strong fragrances than we are.
Blowing out the flame
Blowing out a candle flame is almost a reflex for many of us, an action we don't think much about, even though we can do a lot of damage to a scented candle by blowing out the flame instead of extinguishing it.
In this case, the tiny burnt particles on the wick will get caught in the molten wax, which will make the wax unevenly melted on the next burn and cause the flame to flicker, so it's better to smother the flame. (It probably goes without saying that extinguishing the candle with water can also cause serious damage, so unless there's an emergency, avoid this option too.)
As we have seen, the main cause of uneven burning is usually ourselves. But the good news is that by knowing the mistakes we can make, we can also avoid most of them very easily. If you want to make a candle yourself, all you really need to do is choose the right size wick and let the candle burn long enough the first time you use it. Don't forget that if you give someone a gift of one of our DIY candles, it's important to make them aware of the correct use as well so they can enjoy them to their full potential as well.